DocumentationBlogSupport
Log inSign up
Log inSign up
BlogSupport
Build
Getting StartedPlatform Introduction
Embedded Apps
What's NewOverviewDeveloper GuideSidebar API Quick StartSubmission Checklist for Embedded Apps
Design Guidelines
MessagingMeetingsDevicesSidebarSidebar on Mobile
API Reference
BotsButtons and CardsIntegrationsBYODSService AppsService App GuestsService Apps G2GGuest IssuerWidgetsWebex ConnectLogin with WebexInstant ConnectInstant Connect Meeting LinksDeveloper SandboxBeta ProgramSubmit Your AppSupport PolicyFAQs
APIs
API Behavior ChangesPartners API GuideXML API DeprecationAccess the APIREST API BasicsCompliance
Webex APIs
Reference
Data Sources
Admin
OverviewAdmin APIsHybrid ServicesAuthentication
Guides
Hybrid ServicesWebhooksReal-time File DLP BasicsProvisioning APIsBackground ImagesAudit Events Error Reference
Reference
Admin Audit EventsAuthorizationsEventsGroupsHistorical AnalyticsHybrid ClustersHybrid ConnectorsLicensesMeeting QualitiesOrganization ContactsOrganizationsPartner ManagementPartner Reports/TemplatesPartner TagsPeopleRecording ReportRecordingsReport TemplatesReportsResource Group MembershipsResource GroupsRolesSecurity Audit EventsSession TypesSettingsSpace ClassificationsTracking CodesWorkspace LocationsWorkspace Metrics
Webex Calling Beta
Overview
Guides
Integrations and AuthorizationMetadata and Samples
Webex Calling
OverviewSDKs and ToolsWhat's New
Guides
Integrations and AuthorizationProvisioning APIsMetadata and SamplesBackground Images
Reference
Call ControlsCall RoutingCall Settings For MeCalling Service SettingsClient Call SettingsConference ControlsConverged RecordingsDECT Devices SettingsDevice Call SettingsDevicesEmergency Services SettingsFeatures: Announcement PlaylistFeatures: Announcement RepositoryFeatures: Auto AttendantFeatures: Call ParkFeatures: Call PickupFeatures: Call QueueFeatures: Call RecordingFeatures: Customer Experience EssentialsFeatures: Hunt GroupFeatures: Operating ModesFeatures: Paging GroupFeatures: Single Number ReachLocation Call SettingsLocation Call Settings: Call HandlingLocation Call Settings: SchedulesLocation Call Settings: VoicemailLocationsNumbersPSTNPartner Reports/TemplatesPeopleRecording ReportReportsReports: Detailed Call HistorySend Activation EmailUser Call SettingsVirtual Line Call SettingsWorkspace Call SettingsWorkspaces
Webex for Broadworks
Overview
Guides
Integrations and AuthorizationDeveloper's Guide
Reference
BroadWorks Billing ReportsBroadWorks EnterprisesBroadWorks SubscribersBroadWorks Workspaces
Webex for Wholesale
Overview
Guides
Developer's Guide
Reference
Wholesale Billing ReportsWholesale Provisioning
Webex for UCM
Guides
Integrations and Authorization
Reference
UCM Profile
Contact Center
Overview
Reference
Data Sources
Customer Journey Data
Overview
Guides
Getting StartedFAQ
Devices
Overview
Guides
Devices
Reference
Device Call SettingsDevice ConfigurationsDevicesWorkspace LocationsWorkspace MetricsWorkspace PersonalizationWorkspacesxAPI
Directory Services
Reference
Domain ManagementIdentity Organization
Meetings
Overview
Guides
Integrations and AuthorizationWebhooksWebinar GuideMeeting Resource Guide
Reference
Meeting ChatsMeeting Closed CaptionsMeeting InviteesMeeting MessagesMeeting ParticipantsMeeting PollsMeeting PreferencesMeeting Q and AMeeting QualitiesMeeting TranscriptsMeetingsMeetings Summary ReportPeopleRecording ReportRecordingsSession TypesTracking CodesVideo MeshWebhooks
Messaging
Overview
Guides
BotsIntegrations and AuthorizationWebhooksButtons and Cards
Reference
Attachment ActionsEventsMembershipsMessagesPeopleRoom TabsRoomsTeam MembershipsTeamsWebhooks
SCIM 2
Overview
Reference
SCIM 2 BulkSCIM 2 GroupsSCIM 2 Users
Workspace Integrations
OverviewTechnical DetailsControl Hub Features
Webex Status API
Full API Reference
Admin Audit EventsAttachment ActionsAuthorizationsBroadWorks Billing ReportsBroadWorks EnterprisesBroadWorks SubscribersBroadWorks WorkspacesCall ControlsCall RoutingCall Settings For MeCalling Service SettingsClient Call SettingsConference ControlsConverged RecordingsDECT Devices SettingsData SourcesDevice Call SettingsDevice ConfigurationsDevicesDomain ManagementEmergency Services SettingsEventsFeatures: Announcement PlaylistFeatures: Announcement RepositoryFeatures: Auto AttendantFeatures: Call ParkFeatures: Call PickupFeatures: Call QueueFeatures: Call RecordingFeatures: Customer Experience EssentialsFeatures: Hunt GroupFeatures: Operating ModesFeatures: Paging GroupFeatures: Single Number ReachGroupsGuests ManagementHistorical AnalyticsHybrid ClustersHybrid ConnectorsIdentity OrganizationIssuesLicensesLocation Call SettingsLocation Call Settings: Call HandlingLocation Call Settings: SchedulesLocation Call Settings: VoicemailLocationsMeeting ChatsMeeting Closed CaptionsMeeting InviteesMeeting MessagesMeeting ParticipantsMeeting PollsMeeting PreferencesMeeting Q and AMeeting QualitiesMeeting TranscriptsMeetingsMeetings Summary ReportMembershipsMessagesNumbersOrganization ContactsOrganizationsPSTNPartner ManagementPartner Reports/TemplatesPartner TagsPeopleRecording ReportRecordingsReport TemplatesReportsReports: Detailed Call HistoryResource Group MembershipsResource GroupsRolesRoom TabsRoomsSCIM 2 BulkSCIM 2 GroupsSCIM 2 UsersSecurity Audit EventsSend Activation EmailSession TypesSettingsSiteSpace ClassificationsTeam MembershipsTeamsTracking CodesUCM ProfileUser Call SettingsVideo MeshVirtual Line Call SettingsWebhooksWholesale Billing ReportsWholesale ProvisioningWorkspace Call SettingsWorkspace LocationsWorkspace MetricsWorkspace PersonalizationWorkspacesxAPI
API Changelog
SDKs
Space Meetings Migration
Calling
Introduction
Platform
Web
IntroductionQuickstart
Basics
AuthorizationCore ConceptsCalls
Advanced Features
Call SettingsContactsSupplementary ServicesVoicemailBackground Noise Reduction
Kitchen Sink
Meetings
Introduction
Platform
Web
IntroductionQuickstart
Basics
AuthorizationJoin a MeetingMigration To Improved MeetingsPasswords & CaptchasUnified Space Meetings
Advanced Features
Advanced ControlsDialing In and OutStreams & EffectsVideo Resolution
Multistream
Multistream Comprehensive GuideMultistream Quickstart
Migrating SDK V2 to V3
iOSAndroidBrowserNode.jsClick to Call
Developer CommunityCertifications

Deploy a Webex Integration

Deploy a Webex Integration

This tutorial describes deploying an example application on Heroku, and registering it as a Webex Integration.

Deploy a Webex Integration

anchorObjectives

anchor

As introduced in previous tutorials, Webex Integrations and Bots extend Webex’s capabilities.

By creating custom applications, developers can associate Webex with existing enterprise processes and data. For example, you may add the Jira Integration to an existing Room and get the participants notified when Jira issues (Epics, Story, Task, or Bugs), are created or updated.

Webex Integrations let your applications request permission to invoke the Webex API on behalf of other users. The process used to request permissions is called "OAuth Grant Flow": it is documented in the Integrations guide, and can be experimented in the Understand the OAuth Grant flow for Webex Integrations tutorial.

In this tutorial, we’ll go through an existing Node.js example that displays the name of Webex users. We will deploy it on Heroku, and register it as a Webex Integration.

anchorPre-requisites

anchor

In this learning tutorial, you will deploy an example application on Heroku, and register it as a Webex Integration.

You will need:

  • a Webex Developer account: if you're not yet a Webex User, you can sign up here,
  • a GitHub account: sign up here if you are not already a GitHub user,
  • a Heroku Account: click here to signup at Heroku.

Note: For this tutorial, we’ll stick to Heroku free dynos, so that the deployment won’t cost you any money.

anchorStep 1: Fork a Webex integration

anchor

For the sake of this tutorial, we will leverage a ready-to-run Webex Integration.

This integration example consists of a Node.js server that serves as a HTML page to initiate the Webex OAuth 'authorization code grant' flow. This page drives the user to a consent form. The integration also listens on a “redirect URL” invoked by Webex, as the end-user accepts or declines to manage permissions.

OAuth

Open the Webex Integration example provided for this tutorial. Make sure you're signed in on Github.

Click "Fork" to start working on your own copy of this integration.

anchorStep 2: Deploy on Heroku

anchor

The goal of this step is to create the Heroku project that will host our integration and retrieve its public URL.

Heroku is a cloud application platform that lets you deploy and run code in minutes.

Note that the example provided in this tutorial can be hosted on other private or public cloud application platforms, such as Amazon Web Services, Microsoft Azure, Google Cloud, Clever Cloud Enterprise...

If you don’t have a Heroku account yet, you can signup at https://signup.heroku.com/. Note that for development and prototyping purpose, we’ll stick to Heroku free dynos so that the deployment covered won’t cost any money.

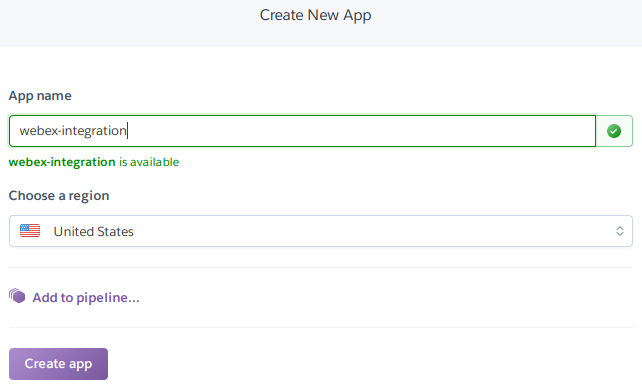
  1. Log on to your Heroku dashoard and create a brand new application:

  2. Once created, Heroku displays your application deployment configuration. The default deployment method is to use Heroku Git.

    For the purpose of this tutorial, we will deploy straight from GitHub, skipping the installation of the Heroku command line interface.

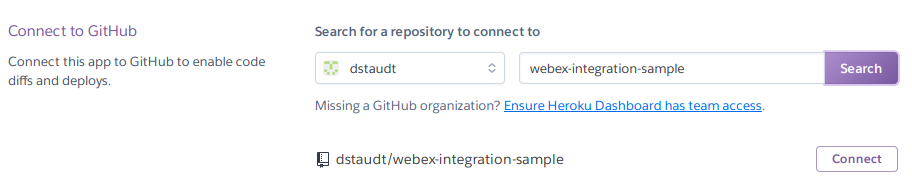
    Click the GitHub option. Among your GitHub repositories, select the webex-integration-sample” project you forked in step 1, and click Connect:

    Connect

    You will end up with a Heroku deployment configuration similar to the one below:

    Connected

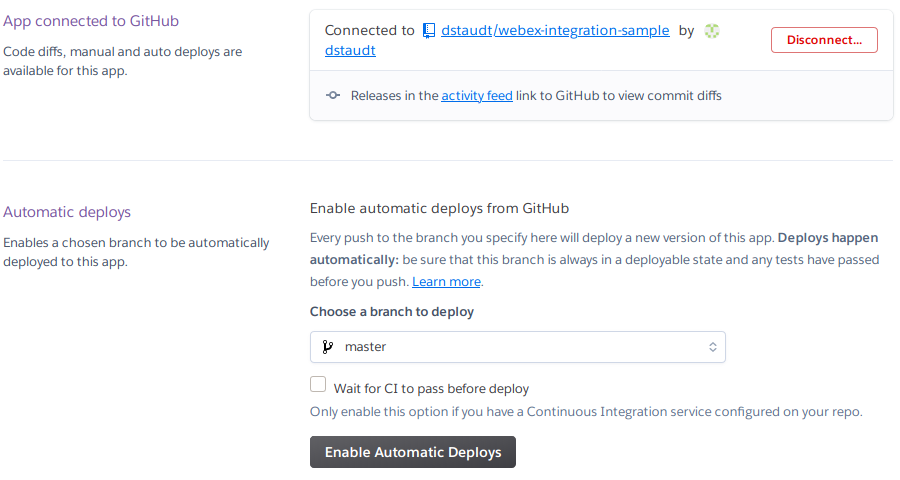
  3. Now, click the Deploy Branch button, and watch Heroku build and deploy your code sample:

    Manual

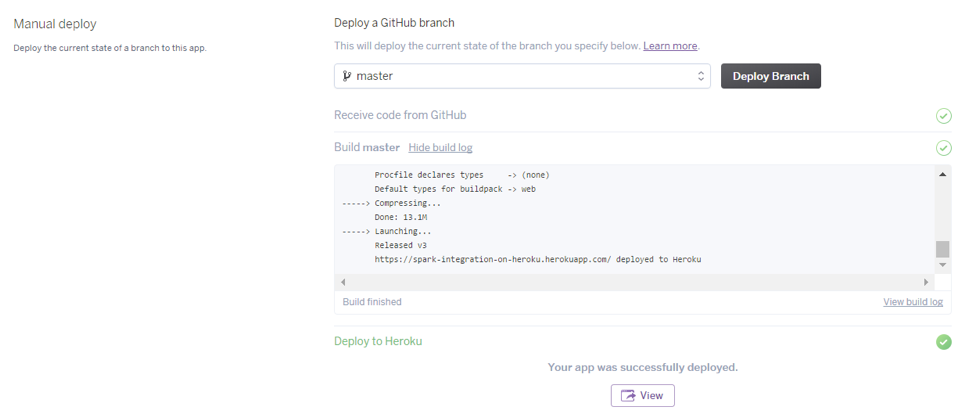
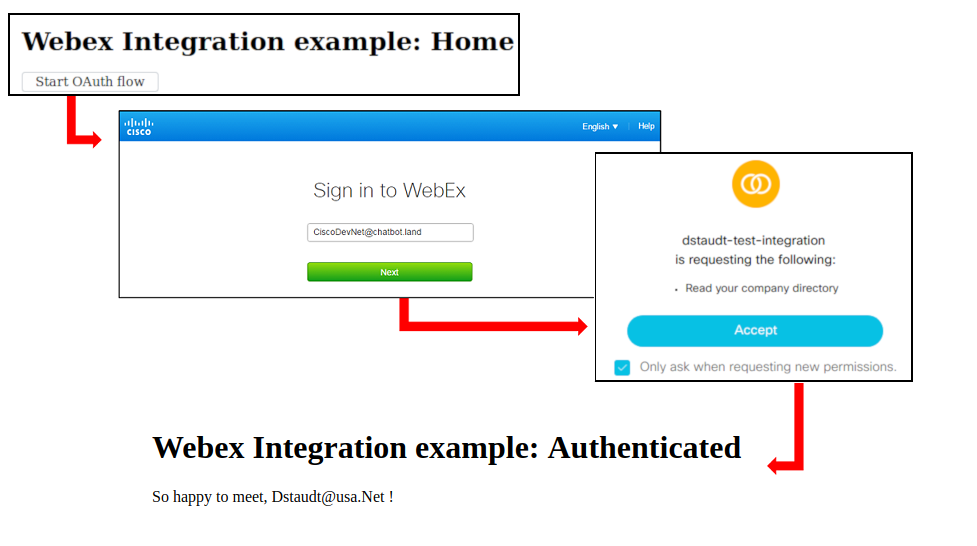
  4. When done, click View to open your app's entry point. An HTML page such as the one below should appear:

    Template

    Don't run the OAuth flow for now, as we first need to register the integration to Webex

  5. Keep the root URL of your integration in a safe place as we’ll need it in the next step.

    The root URL in the example above is: https://webex-integration.herokuapp.com/

anchorStep 3: Register your Webex Integration

anchor

The registration process is how your integration declares the set of authorizations required to execute its custom logic. It also specifies the redirect URL where our integration expects to receive the authorization code from Webex; from this authorization code, our integration will retrieve a time-limited access tokens, acting on behalf of the end-user.

  1. Open the “Create an Integration” form on the "Webex for Developers" portal

  2. Fill in the form with a name, a description, an email and an icon for your integration.

    The icon size must be 512x512 pixels or larger and publicly accessible, feel free to use this DevNet logo png.

  3. In the Redirect URI(s) field, paste the Heroku URL of your integration home page, replacing the index.html suffix with /oauth.

    In our example, the redirect URL is: https://webex-integration.herokuapp.com/oauth

    Fields

  4. The last field of the form concerns the OAuth scopes of your integration. These scopes correspond to the set of authorizations that the end-user will be asked to grant access for.

    For the sake of this tutorial, we will specify that our integration can ask for all supported authorizations, and we’ll refine these scopes at runtime.

    Check all scopes (except for spark:all) and click Add integration:

    Scopes

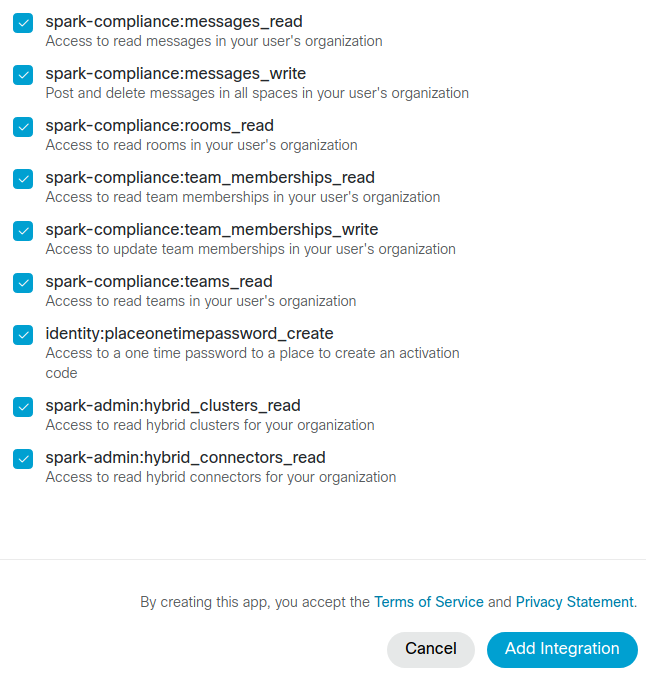
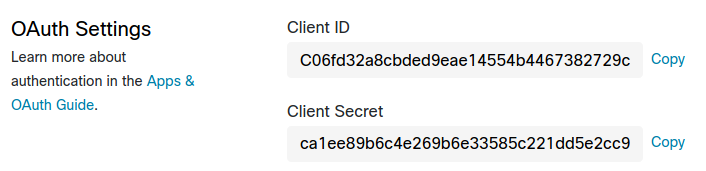
  5. Webex automatically generates a Client ID and a Client Secret which we will use in the next step to configure our live integration running on Heroku.

    Keep this window opened or paste these values in a safe place:

    OAuth

anchorStep 4: Configure and test your Webex integration

anchor

In this last step, we'll configure your Webex integration running on Heroku.

  1. Go to the settings tab of your Heroku project and click Reveal Config Vars

  2. Add new variables for the CLIENT_ID, CLIENT_SECRET and REDIRECT_URI declared previously, and enter in their respective values

    Personal Apps

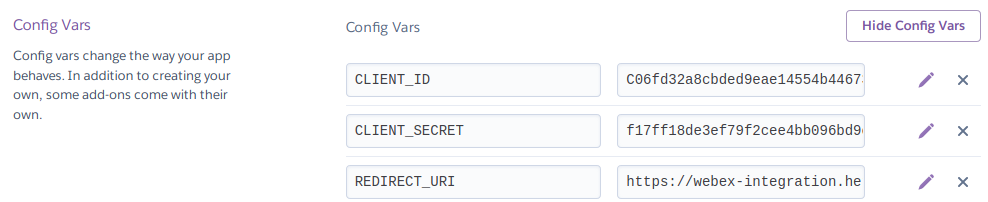
  3. As you add or modify any "Config" variable, Heroku automatically restarts your integration so that you’ll be happy to notice that your integration is now running live and ready to be invoked.

    In the upper-right click Open App, and experiment with your Webex Integration live:

    Example

Going further

What about making your integration list the rooms the Webex end-user has access to?

Tips: Edit the GitHub project you forked in step 1 and:

  • Change the OAuth permission with the spark:rooms_read scope

  • Switch the EJS template to the rooms-list.ejs template provided

  • Load the user’s list of rooms by calling the Webex API List Rooms resource

In This Article
  • Objectives
  • Pre-requisites
  • Step 1: Fork a Webex integration
  • Step 2: Deploy on Heroku
  • Step 3: Register your Webex Integration
  • Step 4: Configure and test your Webex integration

Connect

Support

Developer Community

Developer Events

Contact Sales

Handy Links

Webex Ambassadors

Webex App Hub

Resources

Open Source Bot Starter Kits

Download Webex

DevNet Learning Labs

Terms of Service

Privacy Policy

Cookie Policy

Trademarks

© 2025 Cisco and/or its affiliates. All rights reserved.